How to Deploy React Applications Using Github Actions + Rsync
Posted on Oct 15, 2022
Last update Mar 24, 2024

Source code and deployed app used for this post:
TL;DR
- Create a user in your server to deploy your application:
$ useradd -s /bin/bash -d /home/tutorials -m tutorials
$ su tutorials
- Create a folder to copy your production files to:
$ mkdir rsync-deploy-react-app
Add your private tutorials’s user ssh key to your Action Secrets.
Create a new github action to deploy your application and paste the code below:
# .github/workflows/deploy.yml
name: Deploy

on:
  push:
    branches: [ "main" ]

jobs:
  build-and-deploy:

    runs-on: ubuntu-latest

    env:
      SSH_KEY: ${{secrets.SSH_KEY}}

    steps:
    - uses: actions/checkout@v3
    - name: Use Node.js 16
      uses: actions/setup-node@v3
      with:
        node-version: 16
        cache: 'npm'
    - run: mkdir ~/.ssh
    - run: 'echo "$SSH_KEY" >> ~/.ssh/id_rsa_tutorials'
    - run: chmod 400 ~/.ssh/id_rsa_tutorials
    - run: echo -e "Host tutorials\n\tUser tutorials\n\tHostname 45.76.5.44\n\tIdentityFile ~/.ssh/id_rsa_tutorials\n\tStrictHostKeyChecking No" >> ~/.ssh/config
    - run: npm install
    - run: npm run build
    - run: rsync -avz --progress build/ tutorials:/home/tutorials/rsync-deploy-react-app --delete
Pay attention to the Pre-requisites. That’s it! Change some code, push it to the main branch and see the magic happening!
Motivation
I’ve been working on my bachelor’s thesis in information systems, which is a simple React application, and I was struggling to find a simple, secure and fast way to deploy it to my own VPS. However, most of the content that I had found on the internet involves fancy and complex solutions like docker and Kubernetes or vendor locked solutions like Heroku and Vercel.
I recognize these tools have their advantages, but have found that for small to medium sized projects they are more effort than they are worth to maintain. All I need to do is build the code and copy the built files to the server. Then, rsync came to my knowledge.
Pre-requisites
- An existing React Application;
- An server or a hosting service to deploy your application;
- Your own domain registered;
- NGINX installed in your server;
- Some knowledge about how to register a domain and create a server on some hosting platform (I’ll add articles about that in the future).
Demo App to Deploy
I’ve created an demo app to deploy it to my server. Its source code is available at rsync-deploy-react-app.
Server Setup
For this tutorial, I’ll use my domain leomurca.xyz setting up a sub-domain for it. To be more specific, I’ll point tutorial.leomurca.xyz to my VPS’s IP: 45.76.5.44.
SSH to your server
$ ssh root@45.76.5.44
Create a user to manage your application
To prevent our pipeline to have root access to your server, I’ll create a user to manage deployments called tutorials:
$ useradd -s /bin/bash -d /home/tutorials -m tutorials
After that, change the user to it:
$ su tutorials
As I created the user named tutorials, this user will host for multiple tutorials, so in order to isolate our application, create a specific folder to house our build files:
$ mkdir rsync-deploy-react-app
Github Action Setup
Now let’s create the .github/workflows/deploy.yml to define the pipeline steps. First, add the label for the workflow and when it should be triggered:
name: Deploy

on:
  push:
    branches: [ "main" ]
Above, the workflow will be trigered every time that new code is pushed or merged to the main branch (This happens for Pull Requests merged to the main branch too).
Then, describe a new job that we will name it as build-and-deploy to handle all the steps to build and deploy our app:
jobs:
  build-and-deploy:

    runs-on: ubuntu-latest

    env:
      SSH_KEY: ${{secrets.SSH_KEY}}

    ...
The SSH_KEY: ${{secrets.SSH_KEY}} references Github Secret that is allowed to login in our server. It’s important to mention that we should add the secret to our repository settings.
Also, to avoid issues when authenticating to your server using ssh, use RSA generated keys to authenticate instead of Ed25519 keys. For more details on that, check this doc on how to generate a new SSH key.
Afterwards, we’ll start define the actual steps to be executed:
    ...
    steps:
    - uses: actions/checkout@v3
    - name: Use Node.js 16
      uses: actions/setup-node@v3
      with:
        node-version: 16
        cache: 'npm'
    ...
These first steps will basically define which NodeJS version will be used in our pipeline.
And now, a very important step is to add the commands that will actually be executed in our workflow, pay attention to them:
    ...
    - run: mkdir ~/.ssh
    - run: 'echo "$SSH_KEY" >> ~/.ssh/id_rsa_tutorials'
    - run: chmod 400 ~/.ssh/id_rsa_tutorials
    - run: echo -e "Host tutorials\n\tUser tutorials\n\tHostname 45.76.5.44\n\tIdentityFile ~/.ssh/id_rsa_tutorials\n\tStrictHostKeyChecking No" >> ~/.ssh/config
    - run: npm install
    - run: npm run build
    ...
The configs above we basically:
- Copied the
SSH_KEYto a file; - Created an ssh config to our server using the key created before;
- Downloaded the app dependencies and generate the build files to be copied to our server.
To make the ssh configs more readable, check the code snippet below:
Host tutorials
  User tutorials
  Hostname 45.76.5.44
  IdentityFile  ~/.ssh/id_rsa_tutorials
  StrictHostKeyChecking No
Using rsync to deploy to the server
And finally, add the rsync command to sync the files from the build/ folder to our server:
...
- run: rsync -avz --progress build/ tutorials:/home/tutorials/rsync-deploy-react-app --delete
...
The meaning of each flag used are:
-a: It is a quick way of saying you want recursion and want to preserve almost everything (with -H being a notable omission);-v(-verbose): This option increases the amount of information the daemon logs during its startup phase.-z(-compress): compresses the file data as it is sent to the destination machine, which reduces the amount of data being transmitted – something that is useful over a slow connection.--progress: This option tells rsync to print information showing the progress of the transfer. This gives a bored user something to watch.--delete: This tells rsync to delete extraneous files from the receiving side (ones that aren’t on the sending side), but only for the directories that are being synchronized.
To have more details on all the options for rsync, check its man page.
Complete .github/workflows/deploy.yml
name: Deploy

on:
  push:
    branches: [ "main" ]

jobs:
  build-and-deploy:

    runs-on: ubuntu-latest

    env:
      SSH_KEY: ${{secrets.SSH_KEY}}

    steps:
    - uses: actions/checkout@v3
    - name: Use Node.js 16
      uses: actions/setup-node@v3
      with:
        node-version: 16
        cache: 'npm'
    - run: mkdir ~/.ssh
    - run: 'echo "$SSH_KEY" >> ~/.ssh/id_rsa_tutorials'
    - run: chmod 400 ~/.ssh/id_rsa_tutorials
    - run: echo -e "Host tutorials\n\tUser tutorials\n\tHostname 45.76.5.44\n\tIdentityFile ~/.ssh/id_rsa_tutorials\n\tStrictHostKeyChecking No" >> ~/.ssh/config
    - run: npm install
    - run: npm run build
    - run: rsync -avz --progress build/ tutorials:/home/tutorials/rsync-deploy-react-app --delete
That’s it! Change some code, push it to the main branch and see the magic happening!
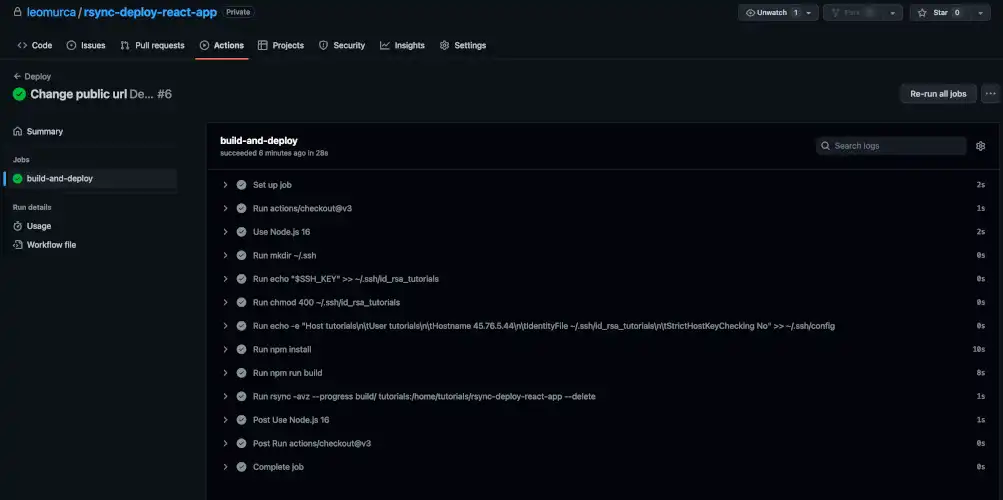
Also, if you want to have more details on the action steps, please check the actions-executed during this article.
Conclusion
Simple, fast and secure, that are the main benefits of using the workflow mentioned in this tutorial. It’s really a relief to have these kind of tools in the middle of many bloated solutions.
If you have any questions or topics to talk about, please reach me out!